Pixelize settings help you guide an AI image-to-pixel-art redraw without turning the process into a complicated editor. You can generate with the defaults, then change one control at a time when the result needs a different frame, palette, Quality, or background.
This page explains what every setting does, when it is useful, and which controls should be adjusted first. Because Pixelize uses AI, most settings are creative directions rather than exact mathematical guarantees. The same setup can produce different details across separate generations.
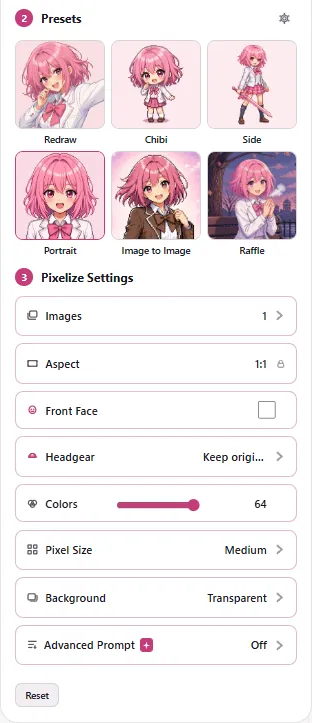
Which settings should you change first?
Use this order when a result needs improvement:
- Preset — decide whether you want a faithful redraw, portrait, chibi interpretation, side view, or scene.
- Aspect and source framing — fix the composition and subject size.
- Background — decide whether the setting should remain, become transparent, or use a solid color.
- Colors and Quality — tune palette density and generation strength.
- Images — request more variations after the setup is worth exploring.
- Advanced Prompt — add written direction only when the standard controls do not express the goal.
This order is practical because framing problems cannot usually be repaired by palette changes. Get the large shapes right before spending credits on fine variations.
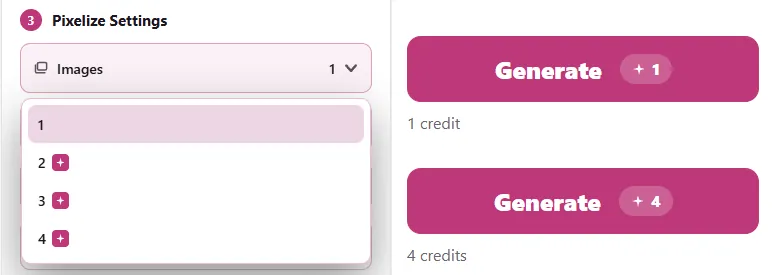
Images: choose how many variations to generate
The Images setting requests 1–4 results in one run. At Low (the default), each image costs one credit. Raising Quality uses more credits. The Generate button displays the total before the run begins.
Use one image while learning a preset or testing a source framing. Raise the number when the composition and settings already look sensible and you want several nearby AI interpretations to compare.
- 1 image: fastest, lowest-cost baseline.
- 2 images: useful for a simple choice between variations.
- 3–4 images: useful when selecting an avatar or exploring a setup you already like.
More images do not increase the quality of each individual result. They increase the number of variations. If a requested result fails, its credit is refunded.
Aspect: choose the output shape
Aspect ratio defines the shape of the generated canvas. It does not simply stretch the source.
- Auto lets Pixelize choose a sensible fit based on the source and preset.
- Fixed ratios include common square, portrait, landscape, and wide formats such as 1:1, 16:9, and 9:16.
Chibi, Side, and Portrait are square presets, so they stay at 1:1. Redraw, Image to Image, Scene, and Raffle support a broader set of aspect choices.
Choose the destination before the ratio. A square works for profile images and compact icons, a portrait shape suits character posts, and a wide frame gives scenes or banner experiments more horizontal room.
Cheat sheet:
- 1:1 — avatars and compact tiles (Portrait, or Redraw at 1:1)
- 9:16 — phone wallpaper / story
- 16:9 / 21:9 — desktop wallpaper or banner
Changing aspect can alter what fits in the frame, so make sure the source still frames the subject the way you want.
Framing: aspect ratio and the source image
The aspect ratio sets the shape of the output. Pixelize uses your upload as-is and the AI adapts it to the selected ratio. To control which part of the source shows, crop the image in any photo editor before uploading, or pick a preset ratio that fits the source.
Framing is the most useful fix when a generated character appears too small. Raising Quality will not make a distant subject occupy more of the frame; making the subject fill your source image (or choosing a closer ratio) is what helps.
Colors: guide the palette size
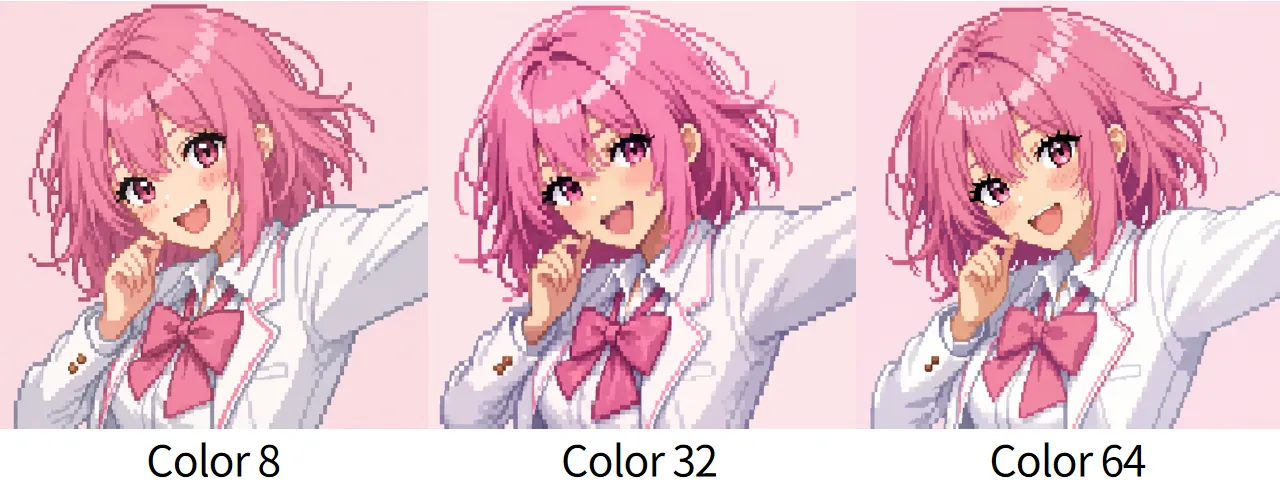
The Colors slider ranges from 8 to 64, with 32 as the default.
- Fewer colors encourage broader color groups and a more limited, retro-feeling palette.
- More colors allow additional shades and can keep more subtle transitions from the source.
Limited palettes are a defining trait of pixel art — the medium grew out of systems that restricted the number of colors an image could use (Pixel art, Wikipedia) — so a lower Colors value is one way to push a result toward that look.
Colors guides the AI redraw toward that palette size; the downloaded file can hold a different count of unique RGB values. Anti-aliasing — the blending of edge pixels to soften jagged boundaries (Spatial anti-aliasing, Wikipedia) — plus transparency and generation details can add intermediate colors beyond that request.
Start at 32. Move lower when the result feels visually noisy or you want stronger color grouping. Move higher when a soft portrait needs more separation in hair, skin, and clothing. Change the setting in meaningful steps rather than repeatedly moving it by one value.
Quality: generation strength
Redraw, Chibi, Side, Portrait, Scene, and Raffle share a Quality control with Low, Medium, and High. It sets how hard the model works on that run — not how chunky the pixels look.
- Low is the default and is enough for most pixel art.
- Medium and High ask for more generation strength. They take longer, and the Generate button shows the higher credit charge.
Image to Image keeps its own model menu instead of this control. Assets Pack does not show Quality.
Quality does not lock a pixel grid or inject “chunky vs fine” prompt lines. Judge the result at the size where you plan to use it.
Background: keep, remove, or replace the setting
Background is available on most character presets. Scene, Raffle, and Image to Image already set their own backdrop (a Scene composition, a Raffle-drawn scene, or your Image to Image prompt), so those presets skip the Background control.
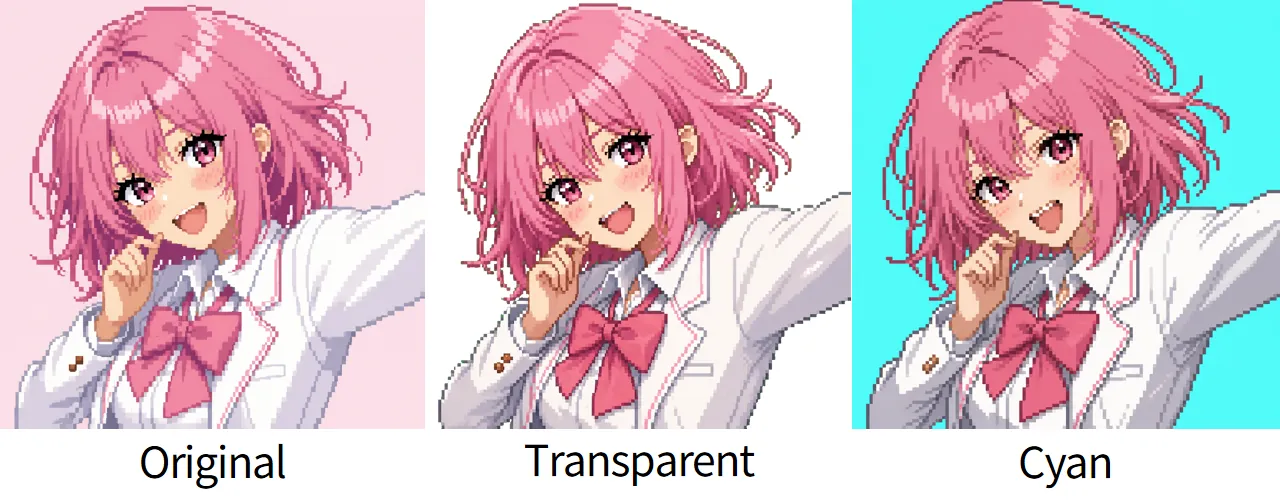
- Original asks Pixelize to retain the general backdrop direction from the source.
- Transparent asks for an output with alpha transparency.
- Color lets you choose a solid fill.
Transparent generation can be convenient for avatars, stickers, overlays, and early sprite concepts. Always inspect the downloaded PNG against both a light and dark checkerboard or solid background. Fine hair, pale edges, and small gaps may need cleanup.
If transparency is incomplete, open the result in the free Remove Background tool. It runs locally in the browser and provides Keep/Remove corrections without spending Pixelize credits.
Advanced Prompt: add written direction carefully
Advanced Prompt is a VIP feature on every preset except Image to Image, where the prompt is the preset's core input and is free to use at any tier. Where it is gated, Advanced lets you add written guidance and includes a stronger Override mode.
Use it for a short direction that the standard controls do not cover, such as a restrained palette note, a general lighting mood, or a simple pose emphasis. Avoid long lists of conflicting requirements. The source image, preset, aspect, and prompt all influence the same generation.
Advanced Prompt does not guarantee exact text, logos, anatomy, accessories, colors, or composition. AI results vary, and Override deliberately leans more heavily on the written instruction. Save the original result before experimenting so you can compare versions.
For access details and limitations, read Plans, credit packs, and when you need VIP.
Reset: return controls to their defaults
Reset restores the default Pixelize settings after confirmation. It does not remove the uploaded source or finished results.
Reset is useful after a long experiment when several controls have changed and you no longer know which combination produced the current setup. Download any result you want to keep, reset, and rebuild the next test with one deliberate change.
Best settings by goal (starting recipes)
These are starting points, not guaranteed formulas. Generate one baseline, then change a single control. Judge the result at the size where you will actually use it.
Faithful image-to-pixel-art redraw
- Goal: closest conversion of the upload
- Preset: Redraw
- Aspect: Auto
- Source framing: as-is unless the subject is too small
- Colors: 32
- Quality: Low
- Background: Original
- Images: 1
Quick anime or character portrait
- Goal: face / bust for a character avatar
- Preset: Portrait
- Aspect: 1:1 (locked)
- Source framing: head and shoulders
- Colors: 32
- Quality: Low
- Background: Original or Transparent
- Images: 1 for the baseline; 2–4 once framing looks right
Tiny avatar, emoji-style tile, or server icon
- Goal: readable at very small display sizes
- Preset: Portrait for a face; Redraw at 1:1 for a single object
- Aspect: 1:1
- Source framing: clear silhouette (head or single object)
- Colors: 8–32 (start lower if the result looks noisy)
- Quality: Low
- Background: Transparent or a solid color
- Images: 1, then 2–4 once the framing works
Cute sticker / chibi remake
- Goal: playful exaggeration with low source fidelity
- Preset: Chibi
- Aspect: 1:1 (locked)
- Source framing: character fills most of the square
- Colors: 24–32
- Quality: Low
- Background: Transparent if you want a sticker-ready PNG
- Images: 1–2
Wide scene or wallpaper experiment
- Goal: place / environment as the subject
- Preset: Scene (or Redraw if a character must stay primary)
- Aspect: 16:9 or 9:16 depending on desktop vs phone
- Source framing: cut empty margins only
- Colors: 32
- Quality: Low
- Background: Scene draws its own backdrop
- Images: 1
Transparent cutout you will finish locally
- Goal: sticker / overlay with alpha
- Any character preset + Background: Transparent, or generate with Original and finish in Remove Background
- Prefer generating Transparent when you already know you need alpha
- Always check the PNG on both a light and a dark surface
An exported result can be useful for personal avatars, stream graphics, mockups, or an early game-asset concept. Review and edit it before relying on exact dimensions, palette rules, transparency, or production consistency.
A simple testing method
Use controlled comparisons instead of changing everything at once:
- Generate one baseline with default settings.
- Identify the largest visible problem: preset, framing, background, palette, or quality.
- Change only the setting connected to that problem.
- Generate one new result and compare it at the intended display size.
- Keep the better direction, then test the next setting.
When the setup is ready, open Pixelize and try it with your own permitted image. For the complete upload-to-download sequence, follow How to turn an image into pixel art with AniPixel.