Presets are the single biggest lever in Pixelize. Before Colors or Quality matter, the preset decides what kind of pixel art the AI aims for. You pick one in step 2 on Pixelize, and every generation follows that direction.
This page uses Pixelize to mean the studio on the navigation bar: upload, pick a preset, generate, download. Match the preset to the result you want to hold, not to the source image. If none of the goals below fit, start with Redraw. How each preset runs, including controls and failure signs, is in Pixelize presets explained. Slider-level settings are in Pixelize settings explained.
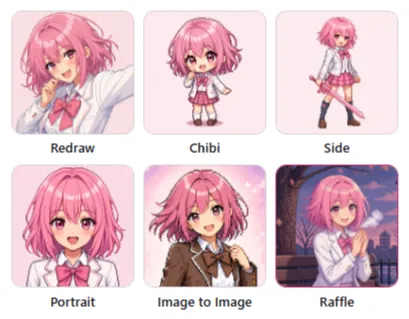
Which preset should you pick first?
Match the preset to the result you want to hold in your hands, not to the source image.
- If you want the closest, least stylized remake, use Redraw.
- If you want a written prompt to steer the result, use Image to Image.
- If you want a cute, exaggerated character remake, use Chibi.
- If you want a different camera angle on a character, use Side.
- If you want a face or bust for a character avatar, use Portrait.
- If the place is the subject, not a character, use Scene.
- If you want a surprise character draw instead of picking every setting, use Raffle.
If none of those sentences clearly describes your goal, start with Redraw. It is the least opinionated preset, so its results tell you the most about how the AI reads your source. Every other preset adds a stronger bias on top of that reading.
Decision tree: which preset when you are stuck
Walk the list top to bottom. Stop at the first match.
- If you want a random surprise draw instead of picking settings, use Raffle.
- If the place matters more than any character, use Scene.
- If you need a face or bust for a character avatar, or a tiny square tile, use Portrait. For a single object, use Redraw at 1:1.
- If you want a cute, exaggerated remake on purpose, use Chibi.
- If you want a different camera angle on the same character, use Side.
- If you are writing a specific prompt to steer the result, use Image to Image.
- Otherwise, use Redraw.
If you already generated once and hate the kind of look, do not nudge Colors first. Switch preset using the list above, then regenerate once.
Common mix-ups
- If you used Chibi and you want the same character, switch to Redraw or Portrait. Chibi is meant to exaggerate.
- If you used Scene on a character close-up, switch to Redraw or Portrait. Scene optimizes for environments.
- If you used Portrait on a tiny face in a wide group photo, crop the source to one face first. The preset cannot invent missing pixels.
- If you wanted a wide banner but picked Portrait, Chibi, or Side, those lock 1:1. Use Redraw or Scene with a fixed aspect instead.
- If you picked Image to Image but left the prompt empty, write what you want changed, or switch to Redraw. Image to Image has no source-fidelity fallback.
- If you wrote a detailed prompt under Redraw and it got ignored, Redraw favors the source over instructions. Move the prompt to Image to Image.
Should you switch presets or change settings?
Switch the preset when the kind of result is wrong: wrong pose philosophy, wrong framing category, wrong level of stylization. Change settings when the kind is right but the execution needs tuning: too many colors, pixels too fine, background should be transparent.
A practical rule: if two generations in a row are wrong in the same fundamental way, the preset is wrong. If they are wrong in different small ways, keep the preset and adjust one setting at a time.
Do presets cost different amounts?
No. Presets share the same billing rule as the rest of Pixelize. The Generate button shows the charge for that run, and a failed slot refunds. Trying two presets on the same source is usually a better investment than four regenerations under the wrong preset. See Plans, credit packs, and when you need VIP.
Next steps
Once the preset matches your goal, read Pixelize presets explained for controls and failure signs, then tune the remaining sliders in Pixelize settings explained.